
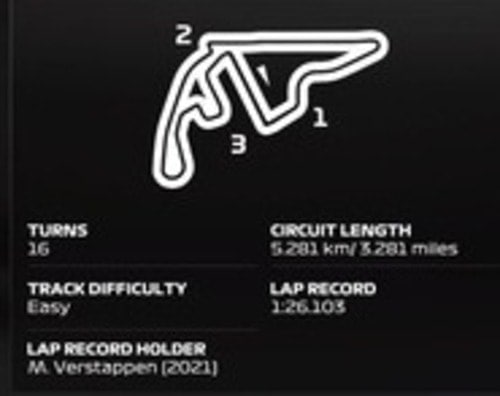
The Yas Marina Circuit in Abu Dhabi has been on the F1 calendar since 2009, with a nice reprofile from the ’22 game onwards which gets rid of the some of the fiddly chicane sections and makes the lap more fun and flowing.
Creating setups here has always been a compromise with the two long straight but the twisty sections as well, and on F1 25 it’s further complicated as you can go down a few different setups routes as regards the downforce.
But generally, a medium-high downforce approach seems appropriate here.
Here’s a general dry race setup for Abu Dhabi for a pad user:
- Wings – 28/30 or 38/40
- Diff – 10/55
- Camber/Toe – -3.50/-2.00/0.03/0.13
- Suspension – 41-3-14-10-22-49
- Brakes – 100% Pressure/55% Bias
- Tyre Pressures – Maximum all tyres
Hotlap With My Setup
More Setup Info & Tips
Wing Levels – There’s a few different routes you can take here:
- Medium downforce – 28/30 wings -better on the straights but traction can start to get a little tricky when the tyres are worn, especially round sector 3.
- Higher downforce – 38/40 wings – slower on the straight but much easier to control over longer stints and maintain decent average lap times. My lap times in clear air in practice were hands down faster using these higher wings (not even close). BUT it’ll be much harder to overtake in the race with the lower top speed that comes with higher wings. Maybe try this if you want to risk a 1 stopper in a 50% race or you want to be clever on strategy and go for an “undercut”.
(right now, I’m usually preferring higher wings, as the extra stability comes in handy towards the end of stints. If the instability of sector 3 on worn tyres is really annoying you, one option is to load the “Increased Downforce” preset template setup from within the game, port over the wing/diff/brake/tyre settings from above but leave the suspension/geometry settings as you find them, and try that. Will give an even more planted feel but probably will be slower).
Tyre Pressures – Very simple round here – max pressures all tyres, no other way. The fronts you can just about keep under control, but the rear temps can be hard to control even using maximum pressures if you’re too aggressive on the traction (more on this below). Also soft tyre only lasts a few laps in a race before overheating.
Intermediate Conditions – You’ll never see rain in career mode here, but if someone sticks some wet weather conditions on in a lobby, add some more wing and space them 4 clicks apart (so anything from say 32/36 to 36/40), raise the off throttle diff to 60 or 65.
Full Wet Conditions – Again, very rarely will you race in the wet at Yas Marina, but if it’s full wet heavy rain, you’d probably want to make some more drastic adjustments to the suspension settings, and also add a bunch more wing and wing spacing so you’re pushing up to high downforce levels. I’d use anything from 40/45 to 45/50 wings and 60 or 65 Off Diff. Also raise ride height 3.5 clicks and be prepared to use Lean mix in sector 3 a lot to make traction easier.
Racing & Strategy Tips
Abu Dhabi is usually an eventful and busy race, with overtaking very possible and safety cars not uncommon. Here’s some tips for navigating a weekend here.
ERS (Qualifying) – You’ve got loads of extra Overtake ERS mode to use on flying Quali laps in online races here – basically as much as you want on the straights. You can use it on the pit straight and two DRS straights, plus anywhere else in sector 1 you can. Aim to run it down to 10-20% as you reach the end of the second DRS zone, as it recoups loads in sector 3. Be sure to use it as it really boosts acceleration and top speed. Ideally, you’d aim to drain the yellow ERS meter just as you cross the line to finish a flying lap.
Overheating Tyres – The rear tyres (especially the right rear) are a real problem round here with all the traction zones. The soft tyre is a no-go in the race (it’s a medium-hard strategy), and even the medium and hard tyres can start to overheat as well, even with max tyre pressures. The only partial way around this is to be that bit more patient and progressive on the throttle out of slow corners. Because assisted traction is so easy on this game (especially medium TC), it can be tempting to slam on the power early and “lean” on the tyres in prolonged corners, but this exacerbates the overheating even more. Try to wait a fraction longer before getting on the power and do so a bit more gradually to lessen the rate at which the rear tyres get to that 107-110 Celsius mark.
Defending/Attacking (Race) – For defending, just deploy all your ERS along both the DRS straights, and don’t use it anywhere else in the lap to let it recharge. Does work if you set your wing levels low enough and focus on getting good exits onto the two long straights. If you’re using the higher wing levels you might just need to concede position to obviously faster cars and play the longer game with strategy, relying on stabler laps times overall across a race. You can also drop behind someone and stick in their DRS to recharge your own battery for a few laps and then get back past them later on (you can still get overtakes down even using the higher 38/40 wings if you save up a load of battery for a few laps and deploy it all along one of the DRS zones after getting a good exit).
Tyre Wear and Pit Strategy – Here are the wear rates I found in testing:
- Soft – 8-9% per lap
- Medium – 5.5% per lap
- Hard – 4% per lap
The soft tyre overheats too quick and basically isn’t usable other than for a few lap blast in a 25% race and then onto the hards. For 50% races, a 1 stop MH is possible sometimes, pitting on lap 10-12, if you can keep the wear rates on the medium down at 6% or less and the hards at around 4% or less. However, a 2 stop (MHH, pitting lap 6-8) can also work and can actually be faster in terms of pure lap time as the benefit of fresh tyres is huge here.
The “undercut” – where you come in 1-2 earlier than your planned strategy – can be super powerful because of the high tyre degradation and also because AI cars often waste loads of time battling each other in the DRS zones. Very useful if you’re using the higher wing angles and struggling to get overtakes done in the DRS zones. Come in slightly earlier for each pit stop, be sure to save 100% battery and work on nailing a good outlap to jump a few cars.