
When we first turn on the latest F1 game, a lot of players just want a stable, easy to control baseline setup to start off with to get used to the handling on a controller.
Thankfully, the pad handling is much improved on F1 25 than on ’24, so this has proved to be a much easier challenge so far for me at least this year.
I’ll share my findings so far on some simple baseline setups pad players can user that are stable and just allow you to lap most circuits consistently to get used to things. I’ve started off with three templates – a middle of the road one, a more stable and “planted” one and a more aggressive one so you can pick whichever once you’re looking for based on preference.
At the bottom I’ll also link off the custom setups for all individual circuits that I’ll be posting gradually as I work my way through my own career mode on the game.
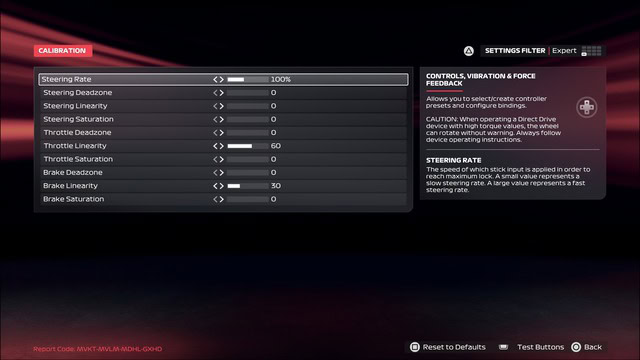
Caveat 1 – These setups were made with my Controller Calibration settings as follows – Throttle Linearity on 60, Brake Linearity on 30, everything else as I found them on default:
Caveat 2 – These setups are obviously early setups made with the early build of the game (June 2025) and so are subject to change as the game and my understanding of the handling evolves. NEW UPDATED 2026 SETUP POSTED FURTHER DOWN
Suggested Starter Template Controller Race Setup For Offline Races (Good Planted Feel)
I’ll start of with just a simple baseline setup that’s not the most aggressive but not the most sluggish either. Just something in the middle that shouldn’t be too hard to control on a pad.
After playing the game for just over a month, what was my more stable setup posted below is now my default setup, because it seems to work most often in providing a good stable planted feel and easier traction throughout a race (not just on fresh tyres).
Here’s my starter baseline for F1 25:
- Wings – 28/30, adjust wings for each track
- Diff – 10/55
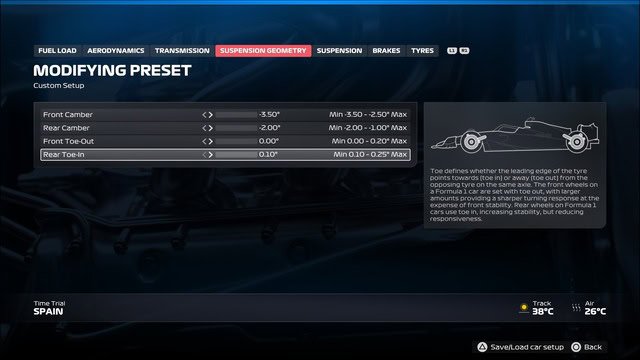
- Camber – -3.50/-2.00/0.03/0.13
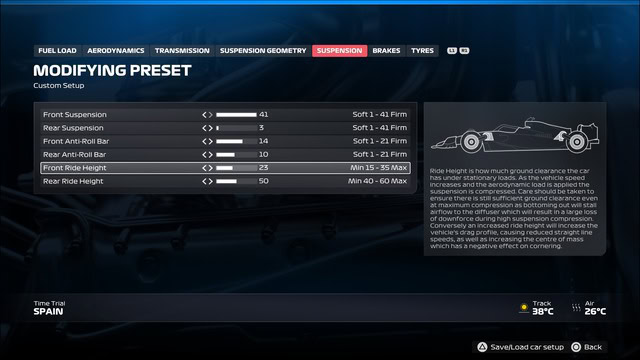
- Suspension – 41-3-14-10-22-49
- Brakes – 100% Pressure/55% Bias
- Tyre pressures – Max pressures all tyres
2026 Update – This baseline was much more effective in the first half of the game life cycle and still is perfectly fine for offline races at around 80-95 AI levels. But for competitive online racing and top AI levels, it’s fallen away in effectiveness as the handling of the game has evolved with patches. Check out my updated 2026 setup further below for an updated baseline that takes into account the new handling.
Keeping the rear wing two clicks above the front gives a good stable feel to the handling, plus the conservative Diff settings make traction easy and prevent over-rotation. The roll bars were originally set at 12-16 but I’m finding 14-10 provides that planted feel that’s useful over entire races.
Tyres do overheat readily on this game so it will be max pressures all tyres on a lot of tracks, but if you’re struggling to get heat into the tyres on certain tracks, lower them to somewhere near the middle or just above.
And then with this baseline, it’s just a case of adjusting the wing levels for each track. Getting this nailed precisely is still a work in progress on F1 25, but here are some early suggestions:
- Lowest downforce tracks (Monza, Las Vegas, Spa as well for some players) – Wings between 1 and 5 (some players are already using 0-0 wings as well)
- Low-Medium downforce tracks (Jeddah, Belgium, Baku, Miami) – 7/9 to 10/12 wings
- Medium downforce tracks (Bahrain, Australia, Japan, China, Imola, Canada, Austria, Britain, Mexico, Brazil, Abu Dhabi) – 18/20 to 22/24 wings – update – will probably go higher for some of these now – see update just below
- High downforce tracks – (Spain, Zandvoort, Portugal, Texas, Qatar) – 28/30 to 32/34 wings (can go higher depending on preference – will now probably go higher for my setups- see important update just below)
- Maximum downforce tracks (Monaco, Hungary, Singapore) – 47/50 or 48/50 wings.
IMPORTANT UPDATE RE: WING LEVELS – It’s starting to become clear that in contrast to the previous few games, it’s actually better on some tracks to run HIGHER wings than lower, as any loss in straight line speed is more than outweighed by better and easier car control and traction on worn tyres, easier to follow other cars, less affected by dirty air, and just generally easier handling and better average lap times over an entire stint (not just when the tyres are fresh).
I’m in process of updating my setups, but I first found this doing my CoTA setup, which has some more analysis of this. Other setups I’ll be going back and revising include China, Bahrain, Miami, Hungary, Zandvoort, Baku, Singapore. Basically any circuits which are classed as “rear limited”, or which have lots of traction zones. You need more downforce at these tracks to maintain solid pace when the tyres start falling off (traction can start getting super tricky on worn tyres, and it can cost you loads of lap time as the back end keeps stepping out if you’re lacking downforce).
IMP Video – You need higher downforce for races when the tyres go off
On some tracks like Monaco, I’ve found that just using the 0.15 for the rear toe only and putting the front toe back to the left also works better.
This setup definitely gives you a more planted, stable feeling but is also more sluggish in cornering. But it’s easier to be consistent and it’s also good to try at circuits where you want total control of the handling to avoid damaging your wing (circuits like Miami, Monaco, Jeddah, Baku, Singapore, plus anywhere else where you don’t want any nervousness or “twitchyness” to the handling with the walls close by).
Updated 2026 Baseline Setup (Online Racing)
The handling of this game has changed quite a lot, and I have been noticing that the above baseline I was initially using offline has become uncompetitive for online league racing. The qualifying pace especially was poor. So I’ve posted an updated, revamped baseline that is more aggressive, accounts for the newer handling model (second half of the game cycle) and can work both for offline and online, but with an emphasis for faster pace for online racing.
- Wings – 28/30, adjust wings for each track
- Diff – 10/55 (reduce to 10/25 for Quali only)
- Camber – -3.50/-2.00/0.00/0.10 (LLLL)
- Suspension – 41-1-1-5-21-41
- Brakes – 100% Pressure/53% Bias
- Tyre pressures – Max pressures all tyres
Key adjustments for Quali – Must reduce the Off Diff to 25 just for quali (you can revert it back for the race) to get sharper rotation and really attack the sharper corners for best lap time. You can also optionally invert the wings, placing the front 3-5 clicks above the rear, again just for Quali and just go for maximum all out rotation and turn in, which you can get away with on fresh soft tyres. Then revert the wings and Diff back to normal for the race for better stability. But quali pace was my main weakness with the older baseline above, so some tweaks are needed for competitive onlline racing.
This baseline might feel slightly trickier to control at first on a pad but delivers stronger cornering with the more aggressive settings. On a pad, you might need to get used to using a more partial steering input with the joysticks, just using about half of the range instead of full lock to prevent over-rotation.
I’ve also put all the camber/toe settings all the way to the left for best possible performance, as well as using more aggressive roll bar settings at 1/5.
If you don’t want to go quite that aggressive on the roll bars, something like 12-16 is a decent compromise, and I can still use this on more uncomplicated tracks like Austria and Monza where tyre wear doesn’t affect you so much.
This is what a lot of the early wheel user setups are running, and it does give better cornering performance, but it will also be more unstable to control on a pad, especially on worn tyres.
Adjusting For Wet Conditions
And for wet conditions, this needs a few more adjustments, here are some guidelines:
INTERMEDIATE CONDITIONS:
Load a dry setup for a track and:
- Add 1-2 clicks on the wings
- Space the rear wing 4-5 clicks above the front for better stability (5 clicks is actually my preference right now as stability is tricky in the wet).
- Lower On Throttle Diff to 10
- Increase Off Throttle Diff by 1 or 2 clicks (5 or 10 points)
Sometimes, even just using your dry setup with the slight wing adjustments also works fine for in light rain inter conditions. Other times you need to make more changes to dial out rotation. It’s all about reducing the rotation to an idea level where you can get back on the throttle smoothly on corner exit without wheelspin or losing the back end because the car is still over-rotating. Dial back the settings above until you get to this point.
FULL WET CONDITIONS:
Full full wet conditions, it’s generally similar adjustments as for inter conditions, just more drastic.
Load a dry setup for the track and:
- Increase wing level 5-10 clicks (add a lot more downforce)
- Space the rear wing AT LEAST 4 clicks above the front for better stability (you might need to test spacing the wings apart 5 or even 6 clicks until you get the required stability. I’m always using at least 5 click spacing in the wet right now).
- Reduce On Throttle Diff to 10
- Increase Off Throttle Diff 2-3 clicks (10-15 points).
- Increase ride height 3-5 clicks
- Soften suspension 1-2 clicks (optional)
- Lower the anti-roll bars 1-2 clicks (optional)
Low speed traction is MUCH trickier in full wet conditions, so it’s again about dialing back the rotation in the setup to allow for easier drive out of slow corners without the car over-rotating. Sometimes, you have to use some pretty extreme settings on a pad to get the required stability, plus turning the ERS down to None in all slow speed sections and traction zones to make corner exits easier.
For example, in inter conditions in Monaco I was using 46/50 wings with 60 Off Diff, and I’m pretty sure that in full wet conditions I’d be using 45/50 wings with the Off Diff all the way up to 65, which I’d never use in the dry. But if this is what’s required to dial out the rotation so the traction is smooth, then go for it.
UPDATE FOR WET CONDITIONS – It seems the AI are incorrectly calibrated for inter and full wet conditions, with lots of players complaining that their pace is competitive in the dry but terrible in the wet using the same AI level. Therefore consider dropping the AI level 10-15 clicks before any wet sessions to try and balance this out for the time being (I guess a patch will be issued at some point to rebalance it). I’m having to drop it down 15 clicks at the moment.
Individual Race Setups For All F1 25 Circuits
As I work my way through my own career mode, I’ll also be posting the individual race setups for all 24 circuits on the calendar in order.
Again, these are early setups and a work in progress but I’ll post what I’ve used first time round here in offline modes. They’ll usually be a tweak of one of my first two baselines posted above, with some settings adjusted. So far, they seem to be decent as they’re allowing me to complete against the AI on 100 Difficulty level on the launch version of the game, which isn’t bad.
Here are the setups one by one:
- Australia
- China
- Japan
- Bahrain
- Saudi Arabia
- Miami
- Imola
- Monaco
- Spain
- Canada
- Austria
- Silverstone
- Spa
- Hungary
- Zandvoort
- Monza
- Baku
- Singapore
- Texas
- Mexico
- Brazil
- Las Vegas
- Qatar
- Abu Dhabi
More F1 25 Setup Resources (All Tracks)
For pad users wanting more precision in car setups, and who test out and compare more custom car setup for all tracks, here are some resources to check out:
- Simracingsetups YouTube channel – Fantastic resource, and a great starting point for me now as a pad player. Always produces great usable baseline setups for all tracks, but I do have to tweak them significantly as his setups are created on a wheel and the wing and Diff levels especially don’t translate well over to a pad for me at least.
- F1laps.com – Another car setup forum with pages for every track, and loads of custom setups posted.
- F1gamesetup.com – An even more specialized resource with custom setups, every car and every track, wet and dry weather. Can also filter setups by car type and input device (wheel vs pad) for even more customization and precision.
- Sim Racing Centre (Premium) – Online shop that sells setups and strategy guides, either by the track or for all tracks in the game in one. Advanced setup resources with aggressive higher end setups (more suited for wheel users).
Just want to say thank you for these writeups, started using these setups this week as I’ve just started playing with no assists and needed as much car stability as I could get to help me, and these are so good! Always feel like I have total control of the car and finally have some setups that don’t lose the back end as soon as tyre wear gets above 15% (that was probably a skill issue though).. Did my first 50% race at Australia, and although I crashed in qualifying so started at the back, after getting used to the feel and controlling acceleration/braking better, I ended up finishing 6th
Hey James, thanks for your comment! Glad to know the setups are useful, that’s exactly what I designed them for so good to know they’re working as intended. Good luck with your no assists journey!
Hi, is it correct that the on throttle is only 10, is this a typo?
Yep, I always use 10 On Throttle Diff, it does cost you some outright traction potential versus higher settings but provides easier to control traction throughout a stint, especially when the tyres are worn. I am aware that most wheel users and some pad players as well use much higher Diff settings, sometimes up to 100, but it’s never worked for me. A wheel and a pad are two totally different input devices and on a pad I want the easiest to apply traction for consistency across a stint. You can try bumping it up up to 20 or 30 or higher on a pad (I think the in-game presets use something like this), but for me keeping it right down at 10 always works best over a race distance.
Thanks for the detailed clarification, i will give it a try
Quick little update, still going well with the setups, I’m awful in qualifying, usually starting 15th and lower, but always score points in a race with the consistency. Question though, are your controller settings still the same as on this page or have you updated them at all?
Sorry, I just saw this update. The templates are unchanged and yes the setups can be weaker in qualifying if used as is. The setups on this page are only generic templates and I do tweak for each track. I recommend checking out the linked individual setup pages for each track, where I often include recommended temporary qualifying tweaks you can make to the setup for better pace. For example, if you’re using something like 28/30 wings, you can invert the wings temporarily in Quali to something like 32/30 and bump the Off Diff down 1-2 clicks for sharper rotation and turn in and faster single lap pace. You can then revert these settings back for the race for better long run stability. But yes these setups are designed for race pace primarily and can be weaker in qualifying if not tweaked.
Thanks for the tips, appreciate it.
Do you still use the same linearities and steering rate, seen different things elsewhere online so was wondering if you’ve tested any other values?
Hey sorry for the late reply again, your replies aren’t showing up in my notifications for some reason so I’m having to check manually. Yes, the pad calibration settings are pretty much unchanged since the setups were created and you could defo try adjusting them. Steering rate would be the crucial setting if you’re wanting a sharper turning rate, increasing it provides more aggressive turning.
Linearity can be a confusing setting but my understanding is that higher values generally makes handling more detailed and precise, so you might want to actually reduce this setting if you want a sharper (initial) steering response versus the rest of the input surve.
Another adjustment I’ve started making sometimes within setups is once fully confident with the game handling is just banging all camber/toe settings to the LLLL setting instead of moving the toe in several clicks like I do sometimes, LLLL just gives outright performance and is doable once fully used to the handling physics.