The Las Vegas track debuted last year on the calendar, and it’s received mixed reviews for sure. It’s an ugly looking track on a map for sure, being likened by some to looking like an upside down pig.
For me, my gaming experienced matched the real life one – I had reservations about it at first but being fair to the track, my races on there have been more fun that I thought. It’s not the worst track on the calendar for sure for me at least (but some people hate this track already).
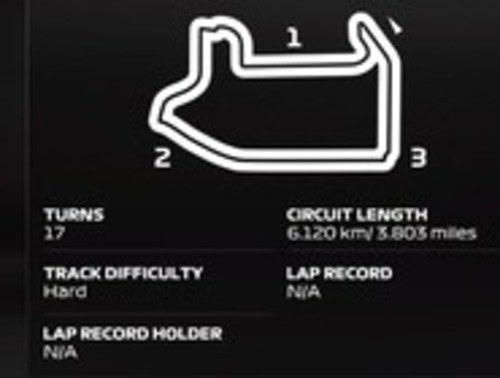
With so much of the lap spent on full throttle – including the massive long runway of a back straight along the LV “strip” – straight line speed is a priority here, so you’re using very low downforce for a setup. Not quite as low as Monza for me at least, but not far off.
Here’s a general baseline dry race setup for Las Vegas for a controller user:
- Wings – 7/10
- Diff – 10/45/50
- Camber – -3.50/-2.20/0.00/0.00 (LLLL)
- Suspension – 40-4-16-11-24-60
- Brakes – 100% Pressure/53% Bias
- Tyre pressures – Fronts minimum/Rears 23.5
Hotlap With This Setup
More Setup Info & Tweaks
You can go different routes with the setup at Las Vegas, so here’s some extra info on creating your own setup for your own liking.
Wing Levels – This is a tricky one. Some race setup are literally putting the rear wing all the way to zero, which I find a little extreme. But it’ll make the car like a rocket on the straights. I want some downforce in the corners, especially as this is where the lap time is really found on a track like this which is mostly full throttle. So I’ve gone a bit higher at 7/10 wing, but I’d say that’s about as high as you can go with the rear wing based on how hard I found it to defend. You could go even lower and try something like 5/8 wings to make it a little easier.
Traction & Grip – Vegas is quite a low grip circuit, so I’ve tried to provide a setup with easy to apply traction and also slightly dampened rotation with the 3 click wing spacing. Designed to make the car easier to control over a longer race as the back end can want to step out coming out of some corners.
Tyre Pressures – Temps are actually always going lower at this track because of the massive long straights, so you can go much lower on the pressures. You can set the front tyres to minimum pressures for example, as this required to get some heat into them. The rear tyres heat up slightly more, and you can set pressures anywhere around the middle, give or take a few clicks.
Intermediate Conditions – You’re not likely to get wet conditions here in career mode, but if someone sticks it on for fun in a lobby, I’d stick largely to your dry setup if it’s just intermediate conditions. Maybe add 1-2 clicks of wing, but keep the 3 click spacing for sure as traction and grip will be even trickier. Also move you Throttle Diff down to minimum if it’s not already there, and bump up your Off Throttle Diff to dampen the rotation for more stability.
Full Wet Conditions – For heavy rain sessions here, it’s even trickier. I’d add a bunch more wing, and make some more obvious tweaks to the suspension settings – soften the suspension and roll bars, and raise the ride height.
Assuming it’s a full wet race, here’s a suggested wet race setup for Las Vegas for a pad user:
- Wings – 13/16
- Diff – 10/55/50
- Camber – -3.50/-2.20/0.00/0.00
- Suspension – 37-4-15-9-28-62
- Brakes – 95% Pressure/53 Bias
- Tyre pressures – Front tyres minimum pressures: Rear tyres middle pressures.
Bonus Setup Resources
Whatever setup you use for a race needs to nail two main things: a) low enough wings to defend on the straights, and b) enough downforce to consistently take the twisty sections well and get smooth corner exits. Here’s some different resources to check out for setups:
- My template setup I usually start my testing with is also perfectly decent at this track, and wasn’t a million miles off the above setup for both Quali and race runs. Just use 7/10 wings and the tyre pressures as in the setup posted above.
- F1laps.com Las Vegas page – Another car setup forum with pages for every track, and loads of custom setups posted, both TT and race, all cars, all conditions.
- F1gamesetup.com – An even more specialized resource with custom setups, every car and every track, wet and dry weather.
- Sim Racing Centre (Premium) – Need to pay for these setups, but they’re higher end eSports style setups with more pace but harder to control as well. Also designed primarily for wheel so may not work on a pad without some tweaking.
Racing & Strategy Tips
I’ve got to say that despite the bed rep this track got at first, I’ve always found the racing here fun, and I certainly prefer it to the Miami track. Here’s some extra tips for racing here.
ERS (Qualifying) – You’ve got LOADS of spare ERS Overtake mode to use on Qualifying laps here in online lobbies – about 12 seconds+. Therefore be sure to use bursts of it along the straights – and especially when combined with DRS – to boost acceleration and top speed. Aim to get the yellow bar as low as possible when crossing the finish line, although unusually the yellow bar usually runs out before the green bar on this track if you start deploying Hotlap mode as you go onto the flying lap.
Turns 1/2/3/4 – This is a tricky little section to open the lap, with a left hairpin followed by the prolonged right hander. I found I got the best lap times by taking an early entry into turn 1, and a wider line through turn 2 for a slingshot onto the straight. Be patient on the throttle in the long right hander if on Med/No TC, upshift through the gears for better traction, and wait until the car is almost pointing straight until going full throttle.
ERS (Races) & Defending – The ERS drains quickly round here, but also recoups quickly (especially in the braking zones from turns 5-9). Therefore you can use it strategically to give yourself a chance of defending on the massive straight. The DRS zone has also been shortened along the strip to make it a bit easier. Just use a short burst out of turn 4 onto the first DRS zone as needed, and then a large chunk on the main back straight if needed to punch away from the cars behind and another burst further down the straight once DRS is activated to defend against closing cars
When trying to defend position, only use ERS Overtake mode strictly when needed to prevent a car overtaking and not elsewhere on the lap (mostly, this is exiting turn 4 and onto the long strip straight). Otherwise, don’t use it and let it recoup the rest of the lap. With 7/10 wings, I was just about able to defend, but next time I might go down to 5/8 to be safer.
Slow In, Fast Out – At this track, I find the best lap times come when I take a slow in, fast out approach to some of the cornering sections, especially the left-right-left sections of turns 7-9 and turns 14-16. Also for the left hander leading onto the massive strip straight. Some of the entry points are kind of unsighted, and carrying too much speed into these sections can really cost you loads of lap time, so I tend to always brake earlier rather than later and focus on getting good traction and smooth exit out of the more technical sections rather than trying to brake later and later and “force” lap times. Braking earlier is also advised simply because brake temps tend to stay chronically low at this track because of all the long straights (they’re often blue on your MFD round here as they struggle to get up to temperature).